We hide pipes in a do-it-yourself drywall box
The pipes in the rooms spoil the appearance, so it is recommended to hide them. There are a lot of ways to make them invisible, for example, just close them with curtains. But, as practice shows, most often masters use boxes made of different materials for these purposes, of which the most popular is GKL. This design is simple, so building a drywall box with your own hands is not a problem. In this way, both vertically installed pipes and horizontally are hidden. Mounting technology is the same. Consider it on the example of a vertical version.
Simple rectangular design
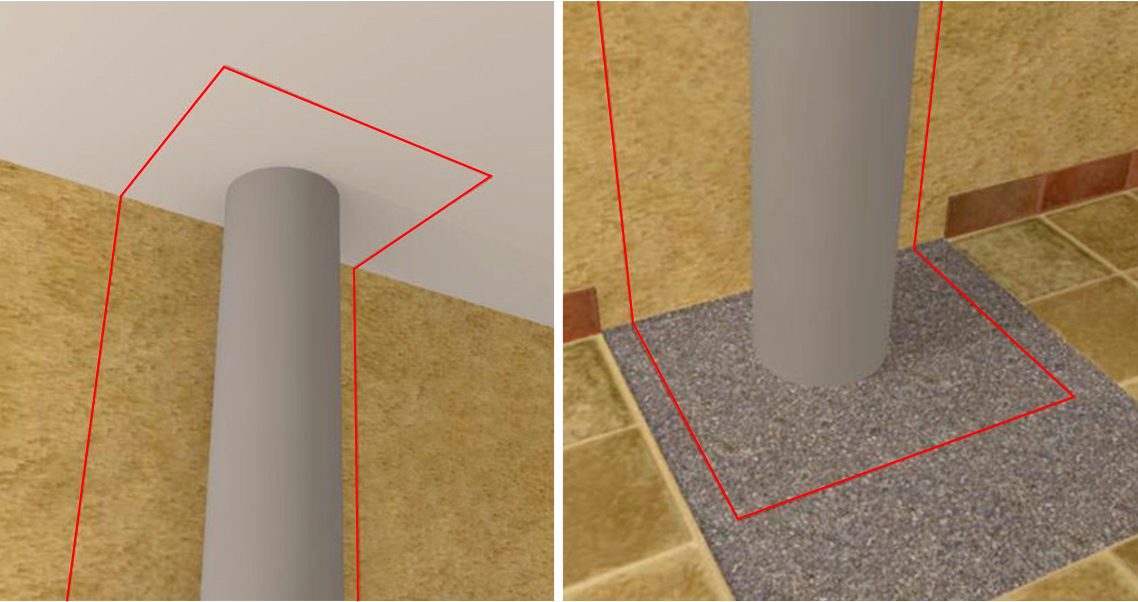
The location of the pipes may be different. For example, they can stand in the corner of the room, and then the device of the GKL box will be in the form of a two-wall structure. If it stands separately near the wall, it will be of three walls. Consider this particular option, it will answer the main question, how to make a drywall box?
markup
This is the most important step. The appearance of the box will depend on it.
- So, 20 cm are deposited from the edges of the pipe in two opposite directions. This indicator is not a standard. Everyone chooses according to their requirements and according to the size of the room itself. Markup is best to start from the ceiling.
- Now, these two points descend marks to the floor. What is the plumb line used for.
- The points on the floor and ceiling are connected by lines.
- Now decide on the depth of the box. On the ceiling, using a corner, lines are drawn from two points. The size of the segment is equal to the depth of the structure. The new two points are connected to each other. That is, a rectangle should turn out on the ceiling.
- Lower from the ceiling with a plumb line two extreme points. On the floor you should get exactly the same rectangle.
Do-it-yourself marking of the frame of the drywall box is completed. You can go to the device of the frame itself.
Assembling the frame for drywall
First of all, a base is assembled on the ceiling from a guide profile. Segments cut to the size of a rectangular contour are installed exactly along the lines and fastened with dowels.
Then two guides are installed along the lines drawn on the walls. After that, the floor contour is assembled in the form of a rectangle. All elements are fastened with dowels in increments of 40-50 cm.
The next step is the installation of two corner posts. For this, either rack profiles or ceiling profiles are used. From them (respectively) transverse elements are cut.
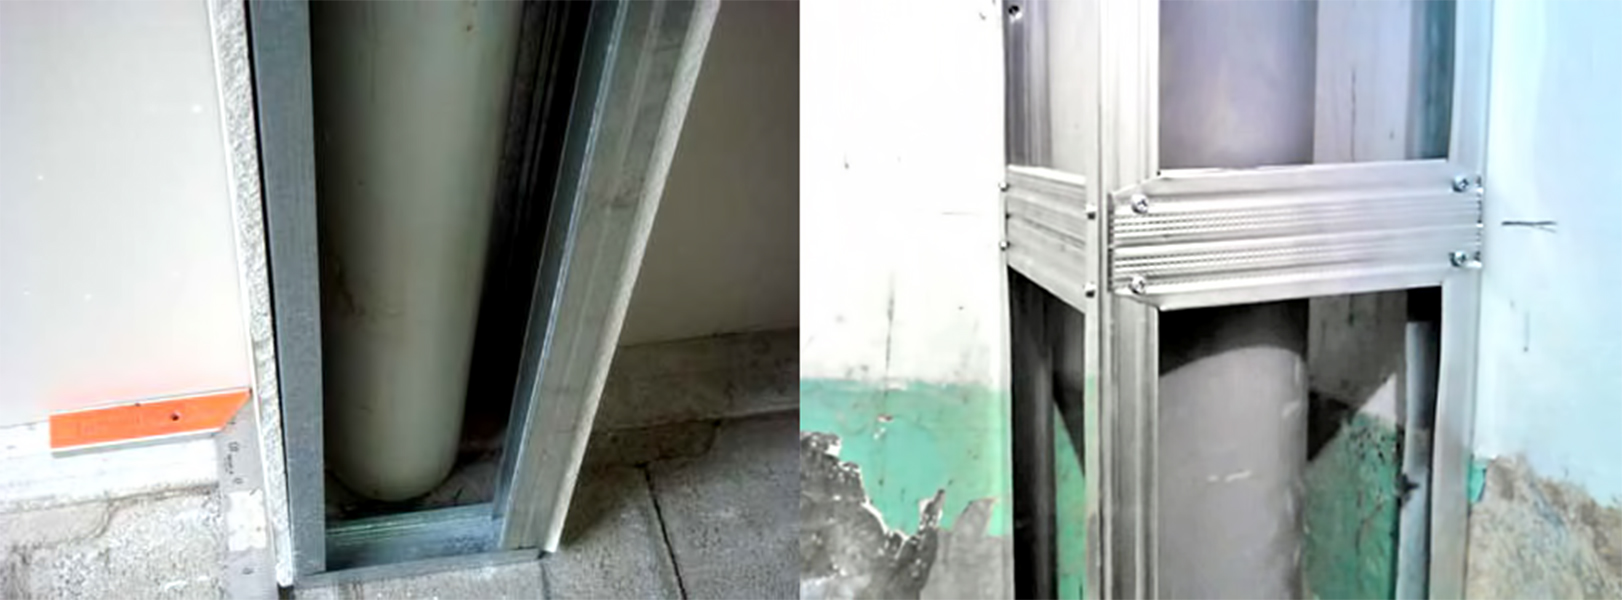
Please note that the installation of the crossbar is associated with two different profiles: guide and, for example, ceiling. The cross member will enter the guide end face, as it usually happens. Here it will be fastened with self-tapping screws. But to join the ceiling profile with the ceiling in perpendicular planes in the usual way will not work.
Therefore, one edge of the crossbar is modified. That is, the profile shelves are cut to the width of the rack, and the horizontal shelf is cut into a cone. It turns out an element with a horizontal pointed shelf, which is called the tongue. So this tongue is laid on a shelf of a vertical rack and fastened with self-tapping screws.
The crossbars are installed horizontally along the entire height of the sides of the structure every 40 or 50 or 60 cm. It is necessary to leave space on the front side for a hatch through which the pipe system can subsequently be serviced.
sheathing
Sheathing the box with drywall with your own hands is a very simple matter. Measure the dimensions of the frame, transfer them to a drywall sheet, cut out the strips with a sharp knife.
Now install the strips at their destination, fasten them to the frame with self-tapping screws. After that, you need to finish the box with your own hands. To do this, putty and tape for sealing joints are used. Apply putty to the joint, lay the tape and apply a layer of putty again.
A strip of the appropriate size is cut out under the inspection hatch. The hatch can be attached to the frame with self-tapping screws or liquid nails.
Backlight
If there is a need to somehow decorate the box with your own hands, then the original version is to make a backlight.
- First, the wiring is done after the frame is assembled.
- Secondly, the wires are attached to the profiles only with clips or clamps.
- Thirdly, under the lamps it is necessary to make holes in the drywall. To do this, you can use a drill with a crown. The diameter of the crown is selected according to the diameter of the glass of the lighting device. Holes are made on the floor, after which drywall is installed.
round box
This version of the drywall box is more complex, but it looks great. In order to make a round structure, it is necessary to make a rounded frame.
To do this, it is necessary to install not a rectangular contour, but a semicircular one from the profiles on the ceiling and floor. You can do it like this. Apply markings, measure the length of the semicircle, transfer it to the profile, cut it off. Now this piece is cut every 7-10 cm along one rack and along a shelf. On the second rack, the profile bends until a figure is obtained.

Why shelf and racks? Any profile is the letter "P", its legs are racks, the upper crossbar is a shelf. Fastening is carried out by a shelf to the supporting structure, and other elements of the frame are attached to the racks.
Both finished elements must be attached to the floor and ceiling. Then connect them with vertical posts from the ceiling profile. Here, many may have a question, how many racks are needed for the frame for a drywall box (made by one's own hands) to comply with the norm? It all depends on the size of the structure, the minimum should be four.
GKL box sheathing
Making a rounded drywall shape is easy. To do this, the sheet must be moistened on both sides and wait until it is saturated with moisture. You can wet it with a roller. Some masters use a needle roller, believing that in this way it is possible to impregnate the sheet faster, because water will penetrate the plaster layer through the holes made by the needles.
Then you apply the strip to the frame, fix it on one side vertically with self-tapping screws and slowly bend it according to the shape of the frame. In this case, every 30-40 cm it is necessary to carry out fastening. Once drywall dries, it will tightly frame the metal frame.