Do-it-yourself wooden model ak-47. How to make a wooden machine with your own hands
The legendary machine gun of all times and peoples - AK 47 made of paper.
Well, it's time to arm yourself with a worthy weapon, the pride of our vast country - the AK 47 assault rifle (Kalashnikov assault rifle). You have the opportunity to glue the deadly AK 47 with your own hands and put the whole dean's office, school, office, neighbors on the ears ... underline as necessary. And if the machine is still strengthened and painted, then there will be an atas in general!

A scan of the AK 47 assault rifle made of paper takes 10 pages in pepakura and, compared to analogues, is not so difficult to assemble. Although there is something to bend over with tweezers at the ready. For all connoisseurs of weapons, this copy is required for gluing.

We are glad to present you another version of the paper Kalashnikov assault rifle scan. This time she came to us from Call of Duty 4: Modern Warfare. The model has its own characteristics and even visually differs somewhat from the first version. It takes 12 pages, but is shorter than the first one by 7 cm. For many, this version of the Kalashnikov assault rifle will not only be easier to make with your own hands, but also better due to good textures.
Today I would like to highlight a hobby that millions of people around the world are fond of. This is a paper model. Surely, some of your acquaintances are or were engaged in modeling - aircraft / ship modeling, wood modeling, assembling plastic models (tanks, planes), etc. In a word, the business is interesting, and the results of successful work please even more, and especially please your guests.
But if almost everyone knows about the above, then about craftsmen who collect voluminous and beautiful models from paper, not many guess. Although it is unlikely that you will find a material more accessible and more subject to processing than paper. Another of the obvious advantages of this direction is that the entire process of creating a model can be done at home, because. special tools / machines are not required here.
Briefly about the types of models
Yes, and the very paper modeling is also different. Under the same direction fall and different kinds origami, and this is already a whole warehouse of directions. In this article I would like to show volumetric (3D, 3d) paper modeling. I still doubt the correctness of the formulation of this direction, but oh well. In general, you will see and understand everything.
Models vary in size and complexity. Here the main factor is the number of sheets of drawings in A4. From what you need to start - paper (you can use a “snow maiden”, sometimes you need a denser one - cardboard), scissors, a ruler (preferably two), a pencil, glue (different ones are suitable, but the PVA moment turned out to be dearer to me). Perhaps that's all. We search the Internet for the request “download paper models” sites, download models, print and get to work. For starters, I would recommend the Canon Creative Park website. There models are presented with clear instructions "for dummies" and other beginners. Actually, I started with this, here are a couple of my undertakings:

My beast
How to make paper AK-47?
Over time, as a seasoned hardball player, I was visited by dreams of collecting something hard. For those who have passed hard and Counter-Strike, there is no particular doubt about the choice - you need to collect some kind of Kalashnikov. The choice fell on the AKM model from some Paper Manufacturing.
In general, that's all, from expenses - 18 sheets of A4 thick paper, I took a liter of PVA (there is still a lot left), and a month of sitting in the evenings. Actually, if I collected more often, then it would take less time, and the model itself would turn out to be better. But what happened, happened.
I post my three-dimensional model of AKM, do not judge strictly.


Model Features
Of the standard interesting things - a removable magazine, a removable receiver cover, the shutter twitches, a removable ramrod, a moving aiming bar.
At the same time, we have the original scale, and a good external resemblance - at night you can rob stalls. Well, I was joking like that.
In a word, quite a funny toy. True lovers of shooting will appreciate it. And for staged filming - you can arm at a small cost, whole crowds of people ... dreams, dreams.
The AK-47 Kalashnikov assault rifle served as the basis for the creation of a whole family of military and civilian small arms of various calibers, including AKM and AK74 assault rifles (and their modifications), the RPK machine gun, Saiga carbines and smoothbore guns, and others. The weapon, created by the outstanding Soviet designer Mikhail Kalashnikov in 1947, is considered an unsurpassed record holder in terms of its durability. The characteristics of this design have become an impressive example of a combination of reliability, simplicity and power.
The word "Kalashnikov" entered the various languages of the planet as not requiring translation. First of all, because the Kalashnikov assault rifle (AK) and its modifications have become the most common small arms in the world, accounting for about 1/5 of the entire firearms arsenal on Earth. Over the years, over 70 million units have been produced. Up to the present time, AK family assault rifles are in service with dozens of armies, including the modern Russian Army.
The history of the appearance of the first sample of the AK-47 assault rifle
In July 1943, the military leadership of the USSR decided to create mass-produced automatic small arms under the so-called "intermediate" (average lethal force between a pistol and a rifle) cartridge. This was the result of studying both captured German samples (primarily the MKb.42 assault rifle) and modern weapons Western Allies in World War II.
A new type of ammunition was intended to replace the unnecessarily heavy, powerful and expensive rifle and machine gun cartridge. The development and pilot production of the 7.62 mm cartridge progressed quite quickly and successfully. The first batches of such ammunition began to be produced in March 1944, and a little later the design of the cartridge was finally finalized. The caliber in the Soviet version of the "intermediate" cartridge was approved with parameters of 7.62x39 mm.
From weapons under the new kind cartridge required the ability to conduct effective fire at ranges of the order of 400 meters. Thanks to the ammunition used, its power should have significantly exceeded the performance of submachine guns and at the same time not be inferior to existing types of individual small arms Soviet army under the old cartridges.
The development of an automatic carbine for the given requirements went through several stages and was carried out in the form of competitions in which a large number of systems of various designers. In 1944, according to the results of the selection, the AS-44 assault rifle designed by A.I. Sudayev, but following the results of its further development, the Soviet military leadership did not like too much weight of the weapon.
In 1946, an additional competition was required, in which Mikhail Timofeevich Kalashnikov also took part, by that time he had already received his first fame as the creator of several quite promising weapon designs. Among them were two submachine guns, a light machine gun and a self-loading carbine chambered for an intermediate cartridge, which lost the Simonov SKS carbine in the competition.
A prototype of the Kalashnikov automatic carbine, now sometimes conventionally referred to as the AK-46, was made at the weapons factory in Kovrov. He did not have many features of the future "classic" machine gun, and according to the results of the competition held in December 1946, he was initially recognized as unsuitable for further testing, but the young designer managed to challenge this decision.
Having obtained permission for further refinement of the AK-46, M. Kalashnikov, together with the designer of the Kovrov Plant No. 2, A. Zaitsev, in the shortest possible time developed a virtually new automatic carbine, using in its design a number of elements of the experimental Bulkin AB-46 approved at the last competition, as well as Sudaev's remaining unfinished automaton.
In the winter of 1946-1947, the next round of the competition showed that the competing sample Bulkin TKB-415, which was not so radically modified, had reliability problems with more high rates according to the accuracy of fire in the updated design of Kalashnikov, which received the designation KBP-580. Ultimately, the choice of the commission was made in favor of the Kalashnikov sample, with bringing it to all the required values in the short term.
It was decided to deploy the serial production of the Kalashnikov assault rifle in Izhevsk, where at the end of 1947 the designer was seconded. IN next year the first batches of weapons passed military tests, and in the middle of 1949, two variants of its design were finally accepted into service under the designations "7.62-mm Kalashnikov assault rifle" and "7.62-mm Kalashnikov assault rifle with a folding butt" (abbreviated as AK- 47 and AKS-47). A variant with a folding metal stock was intended for the airborne troops.
Scheme and design
| Main parts and assemblies | Composition, description and purpose |
| Trunk | The bore has four grooves. The gas outlet is located closer to the muzzle, near the muzzle, the front sight base is fixed on the barrel. The barrel is attached to the receiver motionlessly, without the possibility of a quick change in the field. |
| Receiver | Serves to connect the main parts of the AK-47 into a single structure. The top is supplemented with a removable cover that protects the mechanisms of the weapon from damage and contamination. |
| bolt group | Includes bolt, bolt carrier with gas piston, ejector and striker. It is located in the receiver "posted", moving along the guides in its upper part. The ejector mechanism is designed to extract a spent cartridge case or cartridge from the chamber in the event of a misfire. |
| trigger mechanism | Kurkov type. A single rotary part performs the functions of a fire mode switch (continuous or single), as well as a fuse. |
| Shop | Box-shaped, sector type, two-row, 30 rounds. It consists of a body, a locking bar, a cover, a spring and a feeder. The large taper of the 7.62-mm cartridge case of the 1943 model of the year led to their noticeable bend, which became feature AK look. |
| sighting device | Sector-type sight, graduated in 100 m increments. Division "P" (direct shot) corresponds to a range of 350 m. The rear sight has a rectangular slot. |
| Bayonet knife | The AK-47 adopted a relatively long (200 mm blade) detachable blade-type bayonet-knife, with two blades and a fuller. |
In general, the design of a standard AK 47 includes 95 parts. The machine does not have a classic solid stock. Taking into account the strong receiver, the separate wooden butt and forearm contributed to the retention of the weapon during firing.
The accessory built into the design of the AK is designed for disassembly, assembly, cleaning and lubrication of the assault rifle. Consists of a ramrod, wiping, a brush, a screwdriver with a punch, a storage case and an oil can. The body and cover of the case are used as auxiliary tools for cleaning and lubricating the weapon. It is stored in a special cavity inside the butt. In models with a folding frame shoulder rest - worn in a magazine pouch.
Operating principle
The principle of operation of the AK-47 automation is based on the use of the energy of powder gases discharged through the upper hole in the barrel wall and providing the action of a gas piston with a long stroke. The barrel bore is locked by turning the bolt around the longitudinal axis clockwise by two radial lugs included in the special cutouts of the receiver.
The rotation of the shutter is ensured by the interaction of the protrusion on its body with a curly groove on the inner surface of the shutter frame. Inside the receiver has four guides that set the movement of the bolt group: two upper and two lower. The lower left guide also bears a reflective protrusion.
In front of the receiver there are cutouts for which the bolt is locked, the rear walls of which are, therefore, lugs. The right combat stop also serves to guide the movement of the cartridge fed from the right row of the AK-47 magazine. On the left is a part similar in purpose, which is not a combat stop.
The mass of moving parts of the AK-47 in the aggregate is about 520 grams. Thanks to a powerful gas engine, they come to an extremely rear position at a high speed (about 3.5-4 m / s), which largely ensures high reliability of the weapon, but reduces the accuracy of the battle due to strong shaking of the weapon and powerful blows to moving parts in extreme positions.
The moving parts of the AK-74 are lighter: the bolt carrier assembly weighs 477 grams. The lightest moving parts in the AK family are used in the shortened AKS-74U / The combined mass of the shutter device in it weighs about 440 grams.
Varieties by years
For the first samples of early models, including the serial production that had begun, their insufficiently high reliability, weapon failures when used in extreme climatic and extreme conditions, and low accuracy of fire were noted. In the years after it was adopted, the design of the Kalashnikov assault rifle was significantly improved.
AK-46
The bolt carrier moved along the internal guides of the receiver. The return mechanism included a telescopic rod and two return springs, which were put on the rod from different sides. The cover of the receiver was fixed with a stem shank. To reduce the withdrawal of the barrel due to recoil, a compensator was made in its muzzle - on the side of the barrel behind the base of the front sight, 3 holes were made on each side.
The cocking handle in the design of this automatic carbine was located on the left. Instead of the fuse-translator characteristic of the Kalashnikov, there were separate flag devices. The body of the trigger mechanism was made folding - down and forward on a hairpin.
Military testers noted that the left-hand position of the handle interferes with firing on the move without stopping, in this situation it is also inconvenient to reload the weapon. Similar considerations were dictated by the requirement of the selection committee to combine the fuse with the translator of types of fire into a single unit and place it on the right in order to completely rid the left side of the receiver of any tangible protrusions.
AK-47 model 1946
It is this type of Kalashnikov assault rifle that is considered to be "classic". The transfer of controls to the right side of the receiver made it possible to create a successful fire switch, which is also a fuse.
The large mass of the bolt carrier and a powerful return spring ensured reliable operation of the mechanisms, including in adverse conditions: dusty, dirty, thickened grease. The weapon turned out to be adapted for trouble-free operation in the range of air temperature changes up to 100 degrees Celsius.
The wooden parts of the new weapon - the butt, forearm and handguard, as well as the pistol grip, made from birch blanks - were covered with three layers of varnish, which ensured their sufficient resistance to swelling in damp conditions.
AKM
The modified Kalashnikov assault rifle, which became known as AKM, began to be produced in 1959, which was the result of many years of work not only by its designer, but also by Izhmash technologists. It was as a result of all these changes that the AK-47 turned into a truly outstanding piece of small arms, distinguished by its simplicity of design, high reliability and low cost to manufacture. In addition, the Kalashnikov assault rifle has become lighter, longer-range and more convenient to use.
The design of the USM (trigger mechanism), the butt, and the manufacturing technology of the entire machine were improved. , after all, many technologists worked on simplifying the manufacture of weapons, starting from its first serial batches. A trigger retarder appeared in the USM, which ensures the stabilization of the bolt frame when firing in automatic mode, which gave the machine gun a more accurate and accurate fight.
The muzzle compensator in the form of a petal was installed on the barrel thread, and became one of the main hallmarks AKM. Due to the compensator, the barrel cut was not vertical, but diagonal, and made it possible to mount silencers. Other changes included a decrease in the angle of the buttstock, which significantly weakened the tossing of the barrel up after a shot.
The butt of the machine gun began to be made of plywood, the handguard was made of glued veneer, the pistol grip was made of plastic. The forearm received side stops for the fingers. Phosphate-lacquer coating, which came to replace the oxide, increased the anti-corrosion resistance of the machine dozens of times. The case of the magazine was strengthened with stiffeners, and the design of the bayonet-knife shortened to 150 mm was supplemented by its significantly expanded functionality.
AK-74 model 1974
In the 1960s, the military leadership of the USSR decided to develop small arms for a low-pulse cartridge of 5.45 mm caliber. Among the captured weapons captured in South Vietnam, Soviet military specialists were able to get American AR-15 rifles, the automatic version of which was later adopted by the US Army under the designation M-16. As it turned out, the AKM was inferior to them in many respects, including the accuracy of the battle and the accuracy of the hits.
The reason for this situation was the power of the 7.62 mm cartridge, which gave an excessively strong impulse. According to the complexity of the tasks that arose in this case, M. Kalashnikov later compared the alteration of the AKM chambered for the 5.45-mm caliber with the time of the birth of the AK-47. The main feature of the new assault rifle was a two-chamber muzzle brake, which, when fired, absorbed about half of the recoil energy.
In addition, a rail for night sights was mounted on the left side of the receiver. The new rubber-metal design of the nape of the buttstock with transverse grooves reduced its sliding over the shoulder when conducting aimed fire. The handguard and stock continued to be made of wood, but were replaced by black plastic in the 1980s. external feature butt steel grooves on both sides, which were made to facilitate total weight machine. Shops were also made of plastic.
performance characteristics
Caliber
For the "classic" AK-47 and AKM, the caliber of the used cartridge is 7.62x39 mm. The AK-74 and its various modifications use a 5.45x39 mm cartridge.
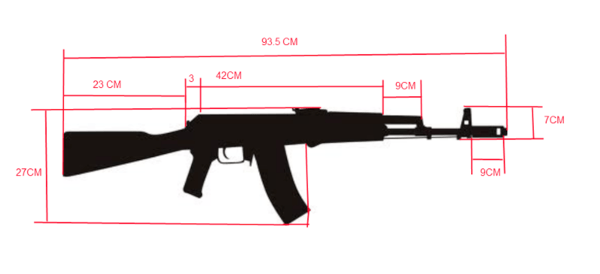
machine length
The barrel length of all assault rifles of the AK family was 415 mm. The length of the machine with a butt was 870 mm for AK, 880 mm for AKM, and 940 mm for AK-74. With an attached bayonet, these figures were 1070, 1020 and 1089 mm, respectively.
Weight with and without cartridges
AK 47 with a full magazine weighed 4.7 kg, AKM and AK-74 - 3.6 kg. The mass of the same machines with empty magazines was 4.1, 3.14 and 3.3 kg, respectively.
rate of fire
The rate of fire of all Kalashnikovs is 600 rounds per minute. Combat rate of fire when firing bursts - up to 100 rounds per minute, when firing single shots - up to 40 rounds per minute.
Shot range
The aiming range for the AK-47 was set at 800 meters. On later modifications of the machine, this figure was increased to 1000 meters.
Instructions for use
Manuals for all types of Kalashnikov assault rifles describe their design, disassembly, assembly, care, combat checks, as well as basic shooting techniques and rules. Attention is drawn to the fact that cartridges with ordinary (with a steel core), tracer and armor-piercing incendiary bullets are used for firing from all types of AK.
The main type of shooting from this type of weapon is set to automatic fire. It is recommended to conduct it in short (up to 5 shots) and long (up to 10 shots) bursts, although continuous firing is also allowed. The supply of cartridges during firing is carried out from a box magazine, the standard capacity of which is designed for 30 rounds.
The most effective fire from a machine gun is considered to be a distance of up to 400 meters. Concentrated fire from machine guns is recognized as effective against ground targets - at a distance of up to 800 meters, against air targets - at an altitude of up to 500 meters.
Incomplete assembly and disassembly of the machine
Partial disassembly of the machine is carried out for cleaning, lubrication and inspection in the following order:
- Store separation and checking the absence of a cartridge in the chamber;
- Removing a pencil case with accessories (for AK - from the butt, for AKC - from the pocket of a shopping bag);
- Department of ramrod;
- Branch cover of the receiver;
- Extraction of the return mechanism;
- Branch of the shutter frame with the shutter;
- Separation of the bolt from the bolt carrier;
- Branch of the gas tube with a handguard.
Assembly after partial disassembly is carried out in the reverse order.
Assembly / disassembly of the mass-dimensional layout of the AK is included in the school course of NVP (initial military training), and later OBZH, while disassembly (assembly) is assigned, respectively:
- for an "excellent" rating - 18 (30) seconds;
- for the evaluation of "good" - 30 (35) seconds;
- for an assessment of "satisfactory" - 35 (40) seconds.
The army standard is 15 (25) seconds.
Pros and cons of the machine
Kalashnikov assault rifles of all modifications were distinguished by rather high combat qualities, combined with performance indicators unattainable for competitors in any extreme conditions. It is the massive all-steel receiver that gives the Kalashnikov high strength and reliability in comparison with competitors, especially with fragile light-alloy receivers for weapons such as the American M16 rifle.
In addition, due to the presence of a removable receiver cover, the assembly and disassembly of the AK is quick and convenient, and this also provides excellent access to the details of the weapon when cleaning it. The bolt group of the AK family, having a “hung” position of moving parts in the receiver with relatively large gaps, ensures reliable operation of the system even with heavy contamination.
But it should be recognized that as the years passed, its shortcomings began to appear more and more - both characteristic of the Kalashnikov design initially, and identified over time, in the process of changing the nature of hostilities and increasing requirements for small arms. To date, even the latest modifications of the AK-47 are generally considered obsolete weapons, with virtually no reserves for significant modernization.
First of all, experts note the significant mass of the Kalashnikov assault rifle by modern standards, due to the widespread use of steel parts in its design. The lengthening and weighting of the barrel to increase the accuracy of fire, as well as the installation of additional sighting devices, inevitably bring its mass beyond the limits acceptable for army weapons. And in attempts to facilitate while maintaining an all-steel structure, the limit has been reached for a long time.
The accuracy of the fire "Kalashnikov" as it was not strong point from the moment it was put into service, so, despite the constant increase in this characteristic during upgrades, it remained at a lower level than that of foreign counterparts. But in general, it can be considered quite acceptable for mass army weapons.
A significant disadvantage in modern conditions is a collapsible receiver with a detachable lid. This design allows the installation of only a limited number of models. modern sights, but this often leads to a shift in the center of gravity. The compact location of the USM inside the receiver has also become a disadvantage only in modern conditions, when individual easily removable blocks have proven their effectiveness, to quickly modify the weapon in various options(self-loading, with the ability to fire bursts of a fixed length, and so on until the transition to new caliber ammunition).
The methods used in the design of the Kalashnikov family of assault rifles to achieve the highest reliability are at the same time the cause of its many characteristic shortcomings, the most significant of which is the decrease in the efficiency of firing bursts. A characteristically pronounced clear click of the AK when the weapon is released from protection unmasks the arrow before opening fire.
The AK-47 magazine receiver without a developed neck was also often criticized as unergonomic and markedly increased magazine change time. The short aiming line of the AK-47-based assault rifles is also often criticized, and most of the significantly revised foreign versions of these weapons were equipped with a fully diopter type. At the same time, such a solution gives real advantages only when firing at long ranges, but the traditional “open” AK sight provides a faster transfer of fire from one target to another and is more convenient when conducting automatic fire, as it closes the target less.
If you have any questions - leave them in the comments below the article. We or our visitors will be happy to answer them.
IN modern world Many children are almost indifferent to toys. Much more interest, now, is caused by electronic gadgets. Of course, every parent is concerned about this and tries to introduce the baby to games with real objects.
One of the most better ways, which can wean a child from virtual worlds - is to make a toy with him. A do-it-yourself machine gun will be a great toy with which you can have a lot of fun. And if you manage to keep it, then it will be an excellent souvenir "from childhood", entailing a lot of pleasant memories.
There are several ways in which an automaton can be created. It all depends on how much time and effort you are willing to invest in the craft. Another important factor is having all the necessary tools. After all, not everyone has a whole set for carpentry in stock.
If the child for whom the product is intended is old enough, then you can further diversify the toy. Namely, to add a shooting function.
The main thing to remember is that in order not to overshadow the process of creating a wooden machine, you should also not forget about elementary safety rules. Protect your hands when working with cutting tools. Get a protective mask and respirator in advance to work on a grinding machine or with sandpaper.
There is a huge amount of fun that you can play with your kids. Undoubtedly, these are outdoor games for the street. At the same time, an integral plus of a wooden toy is its strength. What can not be said about plastic counterparts.
How to make a simple vending machine out of wood
To diversify your child's games, you can make a simple wooden machine gun. It won't take long, but first you need to prepare everything you need.
Tools:
- Circular saw;
- Drill;
- Jigsaw;
- Sharpener 10 cm.
- Sandpaper;
To simplify the work, print out the drawing of the model of the machine. The drawing can be easily found on the Internet. Then follow the instructions below:
- Take a block of wood or a piece of thick board;
- Based on the drawing or photograph of the machine gun, carefully mark the boundaries of the future weapon on the tree with a marker;
If you print the image of the machine on paper, and then cut it out and use it as a stencil, then the product will turn out to be very realistic. After all, all proportions can be observed.
- Start cutting straight lines with a circular saw;
- Pay special attention to sawing out the curved parts of the machine. To do this, you need to use a jigsaw;
- With the help of a sharpener, process the weapon along the contour;
- To make the machine more interesting don't forget to drill holes such as the muzzle;
- Polish the resulting weapon, manually using sandpaper;
- Take a small piece of wire, preferably aluminum, to build the trigger;
- At the end, paint the machine or varnish it;
Such a toy machine made of wood is quite simple to manufacture, and will bring a lot of joy to the child.
How to make a realistic Kalashnikov assault rifle
A realistic model of the machine can be made at home using the available tools. So here is a list of things you will need:
- Thick and wide board (thickness must be at least 4 cm);
- Wood cutting (thin enough);
- Plywood sheet;
- PVA glue;
- Dye;
- Jigsaw;
- Milling machine;
- Sandpaper;
- magnets;
- Marker;
To start, choose necessary material for work. It is better to choose a board made of pine.
When choosing wood for the product, please note that it should not have knots or chips.
We make a sketch on the wood. With a marker we outline the outline of the future Kalashnikov. It should be borne in mind that the store will be separately attached to the machine, so you need to draw it separately. When the image is ready, start carefully cutting out the blank with a jigsaw.

In order for the magazine to be securely attached to the base of the weapon, you need to try it on and grind it several times. Nothing should be hooked, only in this case, during the game, the child will be comfortable.
On the milling machine, add volume to the product. To do this, it is necessary to remove the chamfer from the handle, as well as from the butt. Subsequently, grind the blanks as best as possible.
Take the prepared side parts, cut out of plywood, and glue them to the main part of the machine, smearing it with plenty of glue. Special attention should be given to the contour of the workpiece. After pressing all the details, for more reliable bonding, and leave for several hours, until completely dry. As a result, it is worth sanding the product again so that the plywood parts do not stand out.
Start modeling the barrel of the future wooden machine gun. At this stage, you will need a thin cutting (you can make it yourself, or purchase it in the construction department of the store). You also need to cut out the front sight and drill holes in the machine to later fasten the barrel. Lubricate all parts with glue at the bonding points. After the machine is fully assembled, let it dry.
At the final stage, start painting the resulting model of the machine. You can use dark paint or varnish.
If you prefer paint, then use water-based paint. She is more secure.
In order for the magazine to be attached to the machine more reliably, it is necessary to use magnets. If the purchased magnets are in the form of a tablet, then before gluing them, it is worth drilling small holes in the magazine and the inside of the machine. The diameter of the holes must match the diameter of the magnets. If a roll-type magnet was purchased, then glue a piece of the magnet of the desired shape and size on inner part machine. And in this case, it is necessary to glue a metal plate on the store. Glue is better to choose a quick drying, or superglue.

Now the machine made of wood is ready. This weapon model is very interesting and realistic, which means it will undoubtedly be in demand among children.
How to make a toy machine and wood
Before you start working on a future toy, carefully draw a sketch of the future machine and transfer it to the material from which the product will be made. In addition, each detail must be drawn separately.
Make sure you have all the tools you need for the job at hand. For the initial finishing, you need: a hammer, a chisel, an hatchet, a plane, a hacksaw for wood, a hacksaw for metal, a drill, a level.
For harvesting, you should choose wood from coniferous species. And on the "blank" leave at least 15% of the material as a reserve. This is required for the subsequent adjustment of the shape of the product. All elements of the future machine are cut out separately.
After all the details are cut out of wood, you need to proceed to the grinding stage. To achieve the desired result, use the following sequence. First, process each detail with files. Then use sandpaper, first coarse, and then fine, to bring the surface of the product to the desired level of smoothness.
At the last stage, take care of the design of the future toy. To do this, varnish the surface of the wood, preferably in two layers. Pre-prime the places where the paint will be applied.
Let the toy machine dry. And you can start playing.
How to make a Schmeiser machine
There are many ways to make a machine gun out of wood. It all depends on your skill and the materials that are at hand.
To make a model of the machine you will need:
- Wooden rail - 2 pcs.;
- Super glue;
- Nails;
- Espagnolette;
- Hacksaw;
- Sandpaper;
Boards or slats to be used must be at least 50 centimeters long. We cut the first rail along the middle, leaving only a third. While the bottom part needs to be removed. We divide the second rail into two unequal segments. The longer part will be the magazine, and the short one will be the handle of the future machine.
The prepared parts of the product must be sanded with sandpaper. Then fasten all the parts using glue.
Also, any weapon needs a front sight. Make it from a nail, carefully hammering it into the top of the muzzle. Make the trigger in the same way. Attach a latch to the side of the machine as a shutter.
At the final stage, sand the future toy again with sandpaper. Then cover the entire machine with dark paint. And let it dry.
Now you can enjoy playing with such a slot machine and win new victories.
How to make a simple Schmeiser
It often happens that there is not enough time to create a complex model of an automaton. But this is not a problem, because a simple Schmeiser can be made from improvised materials. You will need:
- Chisel;
- Nails;
- A pair of wide rails;
Divide one of the rails into two parts. It is desirable that one of the halves is longer than the other.
On the second rail, cut out a few pieces in the area of \u200b\u200bthe future trunk. Also in the opposite part, saw off a piece of wood so that you get a sharp corner. It will be an improvised butt, a machine gun.

Finally, use nails to attach the magazine and handle to the main body of the toy.
How to make a dummy machine gun out of wood
Often an excellent material for creating a fake is ordinary plywood. Using one of the methods, you can easily make a model of the machine with your own hands.
For work, you will need the following “basic” tools and accessories:
- Plywood. It is not necessary to use a whole sheet of material, in most cases, scraps are sufficient. However, it is important that the pieces are of the right size and thickness. Sometimes it is worth choosing a thicker plywood, since during use the layout can be subjected to significant loads;
- Tools. This list includes both grinding and cutting devices. To make various recesses and holes on the surface of the dummy, you must have a carpenter's knife or chisel at hand. While a few sheets of sandpaper, of varying degrees of grit, are sufficient for sanding;
- Protective covering. The future product, first, must be coated with a special composition that protects against moisture. And then cover the dummy with wear-resistant paint. Most often, black paint is used for wood. But you can also use silver.
- Glue. In order for all parts of the machine to be securely fastened, it is necessary to use epoxy resin as glue. If it is not available, then you can get by with PVA glue. And in some cases even superglue;
To create a real dummy, you need to find in advance a sketch of a real machine gun. It is desirable that all exact dimensions be indicated on the drawing.
When all the components of the future model have already been cut out of plywood, it is necessary to glue them and securely fasten them until completely dry. Clamps will be very useful in this process. They securely fix all the details together.
In order for the "blank" to take the form of the desired machine, it is necessary to recreate all the holes and recesses. Use a jigsaw for this, first drilling holes, and then shaping them.
The dummy must have a realistic look. And that means you have to work hard. If you don't have enough experience with cutters, it's best to start with simpler parts. Otherwise, you can accidentally damage the product and work will have to start from scratch. However, the result should please with its resemblance to the original.
Pay special attention to grinding. To give the necessary smoothness, carefully process the model with sandpaper. First, go over the entire surface with sandpaper with large grains. For example, marked M - 100. And then use fine paper for a fine finish.
Of course, it is necessary to paint the model. At the same time, please note that the colors must match the original, this model of the machine. Choose the colors you want.
How to make a gun that shoots rubber bands
Any model of the assault rifle presented above can be modified by adding the ability to fire.
The easiest way is to attach a small cutting to one of the sides of the machine. A thin rail may also work. You can install the "trigger" both from above and from the side. The main thing is to be comfortable for small children's hands.
You can attach the cutting with nails or superglue. The main thing is that the fastening is reliable.
Another thing necessary for shooting is an elastic band. It is better to use the so-called "bank" gum. They cost quite a bit and also fit perfectly in size. A couple of such rubber bands are possible, you can find them in your organizer. To charge the weapon, weave two rubber bands, to one of which attach a paper clip. If possible, it is better to make several charges. To fire a shot, carefully grasp the paperclip. In this case, the elastic must be pulled to the very edge of the handle. And then release the paperclip.
Try not to point the weapon at people and animals, because the shot can have considerable force and harm others.
How to modify the machine
In order for the wooden weapon to be fully equipped, in addition to the machine gun itself, you will need a bayonet knife and a belt to carry. This will be especially true if the toy was made of dense wood.
The belt can be made of tarpaulin tape. And attached to the machine on two rings of metal wire, or in pre-cut holes. Also, for more comfortable wearing, you should make a “double loop” of the tape. To do this, you need a piece of a weapon belt twice as long as standard value and a ring of thick wire. First we attach the belt to the machine so that one of the edges is fixed near the barrel, then we thread the belt into the prepared ring and draw it closer to the base of the barrel. We pass the middle of the tape through the mount near the butt. If everything is done correctly, there should be a long “tail” from the belt, to the edge of which, it is necessary to sew a ring made of durable metal, which remains to hang on the fixed section of the tape.
In the future, it is the elongated part of the belt that is put on the person, and the machine gun remains hanging on it. This option of carrying a wooden weapon will allow the child to play carelessly, without having to hold the machine gun with his hand all the time. However, when calculating the length of the belt, it is worth considering that in a free position, the muzzle should not touch the ground.
Now the dream wooden submachine gun has been created and is fully equipped!