Stain.
If you are working with wood and you need to give it a certain color, then you will definitely need a stain. To date, there are several types of stain, which differ in composition. You can find the following in stores types of stains:
- water;
- alcohol;
- oil;
- nitro stains.
Consider each type of stain in more detail.
1. water stain- this is the most common type. It gives the opportunity to paint wood in any tone: from the lightest "pine" color to dark mahogany. Available in liquid and dry form. Liquid water stain can be used immediately, but the dry powder must first be mixed with warm water.
This type of wood stain is almost odorless, which is a big advantage if wood staining takes place indoors. But it dries for quite a long time - within 12-14 hours. In addition, water stain can lift the pile of wood during staining, and this leads to the fact that wood after staining needs to be sanded.
Of all water stains, acrylic stains are separately distinguished, which are based on acrylic resin. They are more resistant to fading, do not wash out with water and lift wood fibers much less. However, they have one drawback - a high price.
2. Alcohol stain is a solution of various aniline dyes in alcohol (denatured alcohol). After applying the stain, the colorants penetrate into the texture of the wood, and the alcohol evaporates. This type of stain dries quickly enough - in 15-20 minutes. That is why it must be applied very quickly to prevent stains and washouts. Uniform staining with alcohol stain is achieved by using an airbrush to spray it.
3. Nitromordant- stain made on the basis of solvents. According to the principle of action, it is similar to alcohol stain. It is applied quickly and with a sprayer.
4. Oil stain- a mixture of dyes and oil (most often linseed). This type of stain is applied easily and evenly. Oil stain does not pick up fibres. The colorants of the oil stain have a high light fastness, which allows the surface to retain its brightness and original appearance for many years. Oil stain can be applied with a spray gun, a wide brush or rags. Oil stain dries in 2-4 hours.
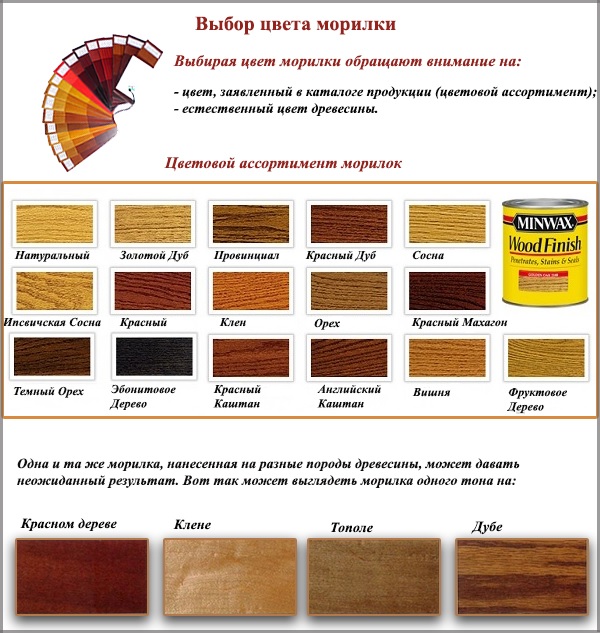
Choice of stain color.
Each color of the stain has its own code, which corresponds to the international classification, and a name that matches the type of wood, the color of which is copied by the stain. For example, stain "Chestnut", "Walnut" or "Cherry". But it is very short-sighted to choose a stain only by the name or the picture on the label, as an unforeseen result may turn out. There are special reasons for this:
1. If stains of the same color and cipher were made by different manufacturers, then they may have different shades. For example, the water stain "Larch" by the manufacturer "Tsaritsyno paints" has a pinkish-brown tint, and the "Larch" produced by "Novbytchim" has a pale yellow color. In various stores there are samples that have been painted with different stains. Such samples will convey the color of the stain much more accurately than the picture on the label.
2. The natural color, structure and density of wood can also affect the result. staining with stain. For example, stain on mahogany will look much darker than on maple (if the stain used was the same tone). This is because mahogany wood has a darker hue than maple wood.
The same test with pine and maple samples will demonstrate that pine wood stains faster and more intensely. Pine has a softer and more porous wood, while maple is denser and harder. For this reason, it is easier for dyes to penetrate pine wood.
The texture of the wood also affects the degree of staining. Oak has a pronounced structure, so it quickly darkens with stain, as the coloring substances penetrate into the recesses of the veins. But the main part of the oak wood, which is outside the veins, is painted more slowly and not so brightly.
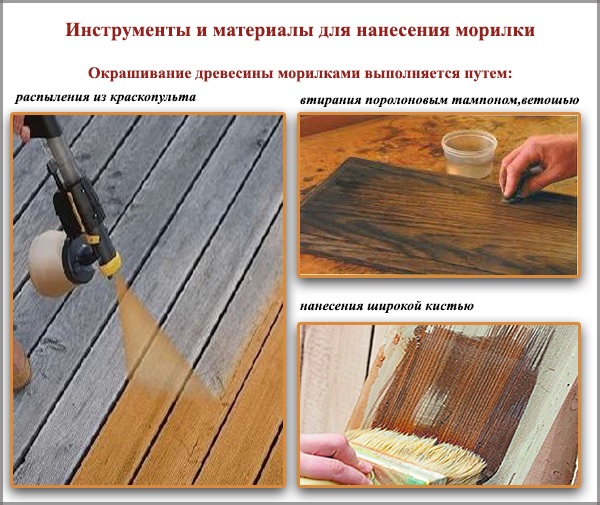
Mortar application methods.
To paint wood stain, you can use an airbrush (nozzle size 1.5 mm or less), a wide brush (width 100 mm), a foam swab or rags. For processing a large area, it is better to use an airbrush. It is also used when working with nitrimorils and alcohol stains, as they dry very quickly, and when using brushes or tampons, stains appear on the surface of the wood.
Brushes, swabs and rags are great for working with water and oil stains. Brushes with natural bristles are suitable for oil stains, and with synthetic bristles - for water stains. The bristles of the brush should be strong and should not leave behind hairs on the surface of the wood.
If fabrics or tampons are used to work with the stain, then they should be cotton or foam rubber. They should not leave behind pile and threads that can remain on the painted surface and, thereby, reduce the quality of the coating.
Preparing for applying the stain: making a color sample.
After stain purchases, but before the start of the staining itself, it would be useful to make a color test. Its need is that it will help to understand whether this stain is suitable for the surface. In addition, the test will allow you to find out what color will turn out in the end, and will help determine the number of layers of application.
To make a color test, you will need a board treated in the same way as the wood that is to be painted. Undoubtedly, the wood species of the sample must match the main surface.
The plank is covered with one layer of stain. After drying, a second layer is applied to 2/3 of the sample. The third layer is applied to 1/3 of the plank. After the stain has dried, the plank is varnished in two layers. Comparing the brightness of the coloring of each part of the sample board, the optimal number of layers for a particular surface is chosen.
In order to choose the best option, you need to do several test stains. Several boards are painted with different stains and then the final choice is made.
Wood treatment before staining.
Before applying the stain, the wood must be prepared. There are several processing steps:
1. First you need to remove the old coating, if any. This is done by scraping and sanding the boards. This process will not only remove the old coating, but also level the wooden surface.
2. Clean the surface from grease and oil stains. To do this, wipe the problem areas with a rag that has been dipped in white spirit or gasoline.
3. Coniferous woods must be deresined before staining with stain. It is necessary to remove resin from the wood structure, which may interfere with stain absorbency. There are several types of solutions for deresining:
Dissolve 50 g of potassium carbonate and 60 g of soda ash in 1 liter of water heated to 60 degrees.
Dissolve 50 g of caustic soda in 1 liter of warm water. Treat the surface with the resulting soda solution.
Mix 750 ml of distilled water with 250 g of acetone.
Any of these solutions must be applied to the surface of the wood in several layers. After 30 minutes, wipe the wood with a cotton cloth and rinse with warm water.
Stages of staining a wooden surface with wood stain.
If the wooden surface is properly prepared for staining, then the procedure for applying the stain will be quite simple. It is carried out in the following steps:
1. First, the stain needs to be slightly warmed up to increase its degree of penetration into the wood.
2. A brush, rag or swab is moistened in the stain. In no case do not allow strong moisture, as streaks may appear and the coloring will become uneven. If a sprayer is used, then the stain is poured into the tank.
3. The stain is applied along the wood fibers. It is necessary to apply the stain quickly and without interruption to avoid staining. If streaks appear, then the surface must be wiped with a cloth, collecting excess liquid along the fibers. Then the surface is left until the stain is completely dry.
4. Similarly, several more layers of stain are applied in order to obtain the desired shade (usually 2-3 layers).
5. Then surface, stained, varnished in several layers. Each intermediate layer is sanded with fine-grained sanding paper.