Do-it-yourself plastic ceiling
Until recently, we could not even imagine what could be done with the ceiling, except to whitewash or cover with a water-based emulsion. If you wanted something "cheerful", they covered it with wallpaper. With the advent of new building materials in our lives, completely new ceiling finishing technologies began to appear. The arsenal of such design solutions includes the installation of stretch, suspended, mineral, glass, mirror, stained glass, plasterboard ceilings, as well as sheathed with wooden or plastic panels. Let's talk today how to make a plastic ceiling.
Features of plastic ceilings
Plastic panels for such ceilings are made of polyvinyl chloride - a safe and harmless material. In our country, PVC panels are used everywhere for finishing ceilings and walls, as well as for the manufacture of containers for food and products. So do not doubt the environmental friendliness of the material.
It is important to remember that plastic panels for walls and ceilings are different, and it is not recommended to buy one to replace the other. Ceiling panels are much lighter, and this is an important detail, although their mechanical strength is much lower. If you use wall panels when installing the ceiling, there will be a large load on the frame, and this is not very safe. And using plastic panels for the ceiling when decorating walls, you can observe their deformation over time.

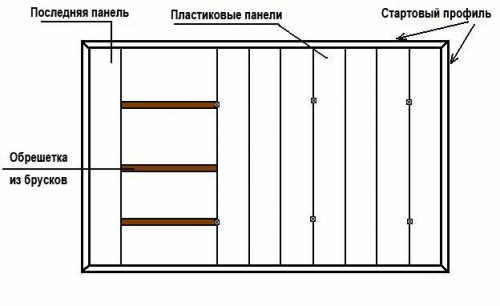
The plastic ceiling is a type of false ceilings. A plastic sheathing is mounted on the frame, which is attached with special suspensions. For the frame you need wooden slats (you can use a metal profile). For the manufacture of the ceiling itself, you can use simple inexpensive materials, but it is better to invest in better plastic. Fixing plastic panels on the ceiling is provided by skirting boards for plastic ceilings and a shaped profile.
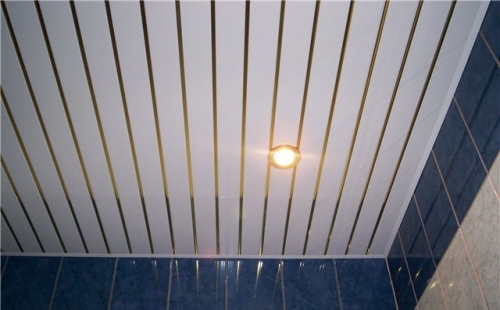
When installing plastic ceilings, there is one caveat. The appearance of the surface depends on the selected panels. When buying glossy panels, the joining seams on such a ceiling will be hardly noticeable, they are practically invisible. The glossy ceiling is a reflective surface that looks quite original. If you plan to make a ceiling of matte, colored and patterned panels, then be prepared that the seams will be visible quite clearly.
Advantages of a plastic ceiling
If you, when making repairs in your apartment, are planning to make a plastic ceiling, your choice is quite far-sighted, because such a ceiling has many advantages. Firstly, if the neighbors flood you, the plastic ceiling will not have to be redone, and if the flooding is not serious, you will not notice anything at all. And this is a big plus, because the ceiling, pasted with wallpaper or whitewashed, would have to be whitewashed or glued a second time.
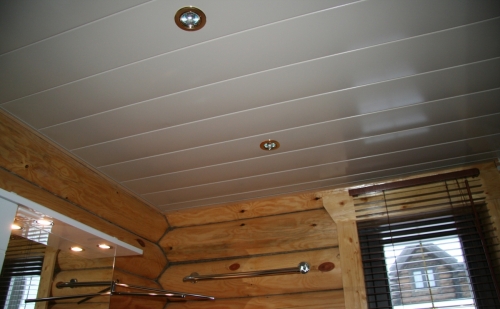
At the end of the work, you will receive a perfectly flat ceiling, which, if desired, can be washed with water or detergents. But even if you do not bother to take care of the plastic ceiling, it still will not lose its beauty and originality. Even in the event of a temperature difference, the ceiling will retain its flat surface. Wallpapered ceilings fade over time, and plastic ones will retain their appearance for many years.

With the help of such a ceiling, you can not only hide large irregularities or pipes, but also turn them into a particle of the interior by arranging beautiful modern lamps in that place. The ceiling can be made not only smooth, but also embossed, using wide panels with contours. Another advantage of a plastic false ceiling is its price. Of course, this is not the cheapest type of ceiling, but, nevertheless, it will cost you much less than, for example, a stretch ceiling. In addition, the air gap that forms between the ceiling and the plastic creates good sound insulation.
Since PVC panels are surprisingly moisture resistant, it is logical to install them in the bathroom. When flooded, plastic panels are able to withstand the weight of water and not be afraid of the main enemy of moisture called mold. Especially if PVC panels are also installed on the walls and in the kitchen. For the same reason, such material is great for lining a home kitchen. Plastic panels in the kitchen are especially good, because such a ceiling is easy to clean with ordinary detergents, and, as you know, with the constant operation of the gas stove, all surfaces are polluted with soot.
The choice of plastic for mounting
First you need to calculate how much material you need. It's easy enough if you know the area of the ceiling. If not, then it can be measured. A complex configuration room will need to be divided into parts - rectangular sections on the ceiling, then the results should be rounded up. If the room is rectangular, it will be easier to measure everything.
When buying, you just need to look at the packaging - the area of \u200b\u200bone plastic panel must be indicated there. Also take into account the number of panels in the package, consider how many panels you need to cover the entire area and add a little (taking into account trimming and the like).
You can determine the type and color of plastic directly during the purchase. The design of the whole room depends on which panels you choose for mounting the plastic ceiling. White panels are the cheapest, while patterned and textured panels will cost more. All panels must be in the same color (color scheme) and the pattern, if any, must be accurate and correct. If a panel that catches your eye is lighter than the rest, or, on the contrary, very dark, it is best to change it to one that fits perfectly into the overall tone of all panels.
When you buy a material such as plastic, you need to be very careful and inspect each panel, because defective models are not desirable to use. When you bought plastic, when transporting it to the house, remember that it cannot be damaged, because then during installation it will not fulfill its function and will not create perfectly even joints.
Choice of materials and tools
So, first you should get acquainted with the most common profiles for attaching plastic panels:
- The starting profile that is most frequently encountered. Such structures serve to close the ends of the panels and are attached to the ceiling around the perimeter of the entire room.
- H-profile is also called connecting. Based on the name, it is used to increase the length of the panels.
- F-profile is designed to close the ends of the plastic panels at the outer corners when moving to another plane. That is, one wall is sheathed with PVC panels, but the one around the corner is not.
- The plastic ceiling plinth is essentially the same starting profile, but a little ennobled.
- The outer and inner plastic corner are used to close the end panels at the inner and outer corners.
- A universal plastic corner can be glued to any corners, but it does not look promising.
To determine the number of profiles, you need a pre-drawn scheme. Draw on paper a proportionally reduced ceiling. It should be borne in mind that the profiles should be 60 centimeters apart from each other. Thus, it will be easier to deal with the number of bars, the footage of the plinth and profile. You will also need to buy suspensions for the frame, lamps (if necessary) and fasteners.
Profiles are also required that are attached around the perimeter. The number of self-tapping screws for fastening panels and dowels, which are necessary for fixing the profiles, is calculated taking into account the number of required profiles, plus a margin. If desired, replace the profiles with wooden beams and use staples instead of self-tapping screws. So you can reduce the cost of the process and simplify the assembly of plastic panels.
To calculate the amount of ceiling plinth required, divide the ceiling perimeter by 3 (if the segment is 3 meters long). From the tools you will need: a ruler, a wallpaper knife, a tape measure, a building level, a hacksaw, drills, a stepladder. As well as a drill, puncher, dowels, self-tapping screws, paint cord, hangers and ceiling profiles. When all the tools are prepared and the materials are purchased, you can start installing the ceiling.
Preparatory work
Basically, preparatory work when installing a plastic ceiling with your own hands is not needed, but if you wish, you can sand it with medium grit sandpaper. Of course, if you are making such a ceiling in a room with increased humidity, for example, in a bathroom, it is better to treat the concrete floor with an antifungal compound.
The first step is to determine the level of the future ceiling (how many centimeters it will be lowered down). If you still decide to mount the lamps, do not forget to leave room for them. Basically, the fixtures have a depth of five to ten centimeters.
If you mount the fixtures yourself, pay attention to the resistance of the wire you buy, but without certain knowledge in this matter, it is better to turn to a professional. It is better to fix the wires above the plastic in advance and bring them to the switch. The wiring must be isolated and hidden behind the profiles. Next, we make markings on the wall around the perimeter.
Mounting the box on the ceiling
When determining the horizontal, it is important to remember that the slanting ceiling will be striking, so you need to measure everything more than once, first measuring the height of all corners and choosing the lowest one. Then you should retreat 5 centimeters to the floor and mark the horizontal, using the water level. In the corners and on the ledges, you should leave marks, as in the photo of plastic ceilings. Further, using a masking cord, beat off the lines that were previously determined.
On the marked strip, which shows how much lower the ceiling will be, you need to drill holes for the dowels. This should be done with a drill or puncher. Through the profile you need to make holes directly. Insert the dowels into these holes, and attach the ceiling profile to the wall. The usual length of such profiles is three meters, but they can also be connected to each other if you suddenly have a very large room by inserting one into one. At the same time, do not forget to fasten the profiles to each other with bugs.
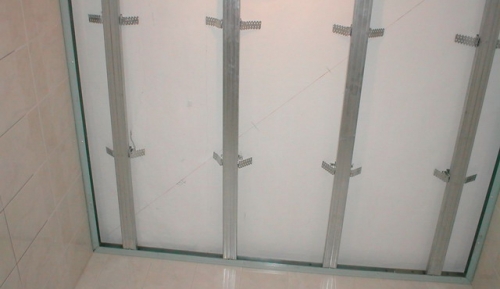
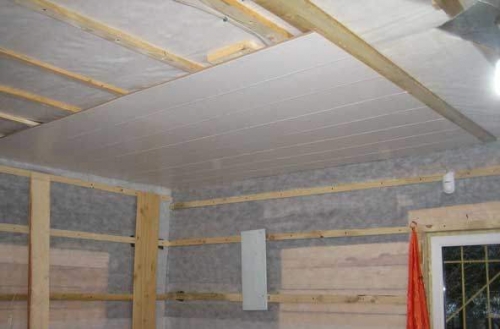
Along the entire perimeter of the room, a profile should be attached to the wall, and on the ceiling - suspensions to which the ceiling profile will be attached. Hangers should be mounted along a straight line. The desired lines can be created using a masking cord, not forgetting the distance (about 60 centimeters from one another).
After that, you need to pull the thread-fishing line. This must be done as shown in the video about plastic ceilings, across the entire room, from wall to wall. Further, this thread should be attached to the dowels that already hold the profile. It is important to remember that if you pull the fishing line incorrectly or not tight enough, sagging cannot be avoided, but you need to get a perfectly even horizontal line.
At the level of the thread, the profile should be fixed. This requires an assistant who will hold the profile so that it is as close as possible to the thread, but does not touch it. Having attached the profile to the suspensions, you need to bend them. When the frame is built, you can proceed to the ceiling sheathing with plastic. The plastic itself is recommended to be fixed with self-tapping bugs, not forgetting the points of contact with the profile. It is better to seal even the smallest seams with silicone, and remove excess material with a spatula so that the ceiling looks neat.
plastic ceiling lining
When you start working directly with plastic, pay attention to the room. If it is slightly skewed and uneven around the perimeter, then the first strip of plastic must be cut off very carefully in order to properly hide this flaw. It is necessary that the following strips are attached to the profile perfectly, at a right angle.
It is important to know before making a plastic ceiling that the installation of panels can be carried out not only across the room. You can install the panels along and diagonally, and the colors can thus be easily combined if you want to get an original ceiling with an unusual pattern as a result. If you have chosen thin plastic, then it can be bent, trimming the corners, this will help create an unusual design. There is also a special corner plastic that hides the panel joints. With the help of plastic, you can also make a multi-level ceiling.
Installation of PVC panels on the ceiling starts from one wall. They need to be cut exactly along the length of the surface with a hacksaw, jigsaw or grinder. When cutting the first panel, it needs to be made a little shorter than the width of the room, by about 3-5 millimeters. Clean the edges with a sandpaper or abrasive mesh. Try not to wrinkle the panels. And most importantly - before installation, do not forget to remove the film from them!
It is necessary to work carefully, because this material is quite fragile. Plastic should be treated with care before plating. If you have already caused damage to the purchased plastic, you can try to hide them with silicone, preferably white. This option will not work if you opted for colored plastic, because silicone is white and transparent.
Fasten the first panel tightly with self-tapping screws on the profiles, fasten all subsequent panels to the rails of the mounting profiles according to the type of constructor. The most difficult stage of the whole procedure is the installation of the last panel. You need to cut along the length by a millimeter less than the distance from one wall to the starting profile at the opposite one. Insert the panel with one side as far as it will go into the profiles, directly into the corner.
The second end will hang freely, slide the panel out of the first corner and insert it. Between the penultimate and last panel you will have a small gap, but they need to be joined somehow. Sometimes you can do it on your own, but most of the time it doesn't work. Then you can use masking tape. Glue a couple of strips across the last panel and pull it up to the previous one.
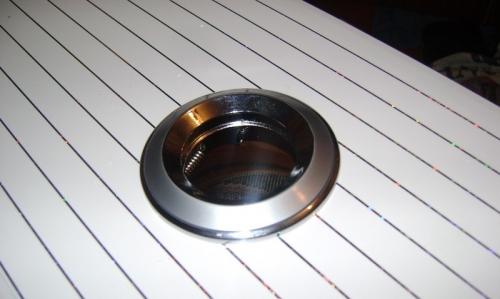
To mount the luminaire, mark the location on the panel with a pencil. Then you need to cut a hole using a clerical knife. Insert a lamp into the hole and connect the wire to it. Wires need to be run under the ceiling. If you need to install several fixtures, it is recommended to connect them in parallel to each other.
At the end of the installation, the room will change a lot. But it will still need to be glued with a frieze around the perimeter. This is done in order to hide the plastic attachment points. And given the moisture resistance and practicality of such a ceiling, we can say that this is a fairly profitable choice for repairs in your home.